Copy of Article Text Below
.....to translate the illustrated paint scheme into reality. It just so happened that Metalflake have recently extended their range of candy finishes to include around several more superb shades, one of which is dark blue. This particular shade was picked for the whole car, but with a few subtle variations. A mixture of both pearls and candies were decided upon for the stripes, but more about these later.
Obviously the first job entailed stripping the car of all brightwork, wipers, windows etc, till we had a basic shell. The trim proved straightforward enough to take off, but the windows posed more of a problem for Peter (photographer) and myself.
Fortunately though, 'mad Mike' the Welshman (as he is affectionately known) was at hand and within minutes, he had successfully punched out all the glass while we disbelievingly looked on (thanks Mike).
FLATTING
So now we had the basic bodyshell of a rather sorry looking Fiesta, devoid of all exterior trim which now needed flatting down using 400 wet 'n' dry to prepare for the trick paint job.
After a good two days work next came a couple of coats of grey primer, followed by a guide coat. Again using 400 wet 'n' dry this was eventually rubbed smooth in a couple of days, after which the car came under careful scrutiny to check for any minor imperfections in the fibreglass which may have been missed. A couple of pin holes here and there were filled with body putty rubbed smooth and then we were ready.
As previously mentioned the wheels were also to be sprayed blue to match the colour of the car and we took this theme further to include both the front and rear bumpers. So after flatting down with production paper these along with the wheels were primed in readiness.
APPLICATION OF COLOURS
We were looking forward to witnessing the application of colours since Keith had up his sleeve one or two variations that would ultimately result in a truly dazzling colour scheme. This is what happened! First came a coat of Metalflake black acrylic (not really what you would expect in producing a blue paint job) over which a mixture of both candies and pearls were to be applied.
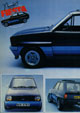
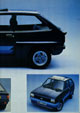
First came a coat of SP10 Star Pearl followed by a mixture of Deep Blue Candy C-21 and Star Pearl Silver Mist SP-8. The results were mind blowing, and produced an inky blue finish that changes colour under certain lighting conditions.
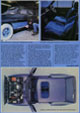
This was then sealed with a couple of coats of clear laquer and left to harden. After a couple of days we could then progress with the application of the stripes which Keith began marking out using Va" tape. It was decided that three stripes would eventually wrap round the front of the car ending by the back edge of the doors in sharply angled cut offs.
With the rest of the body suitably masked off the whole designated stripe area was treated to a coat of white acrylic lacquer, so as to give a bright base for the following colours. First came Iced Blue 'Star Pearl,' for the lightest shade, followed by a mix of this plus 'Candy' Regal Blue and Dark Blue for the remaining two stripes. The front bumper being colour co-ordinated with the top stripe, in Iced Blue and likewise the wheels were similarly treated.
Now we or rather Keith had only to cover the whole car with several shades of Metalflake Clear Laquer to complete the spray work and seal in the exotic finish.
We had to wait a couple of weeks after spraying to give the paint time to harden, before flatting down to reveal the true quality of the finish. For this purpose you should use 1200 grit wet 'n' dry and plenty of clean soapy water, working on one panel at a time until the paint is flatted down removing all traces of orange peel but taking care not to go through the laquer.
Flatting down a vehicle of this size takes just over a day to complete after which the whole process is painstakingly repeated by going over the whole car with T-cut or similar in an effort to remove the scratching caused by flatting down and produce a super smooth finish.
Only when you've done this can you.....
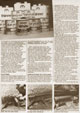
Captions -
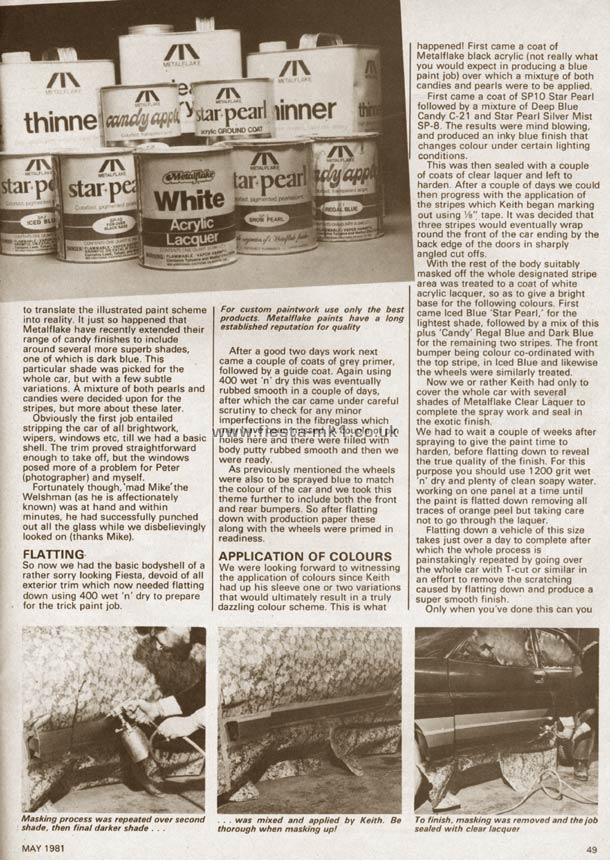
Middle - For custom paintwork use only the best products. Metalflake paints have a long established reputation for quality
Bottom-Left - Masking process was repeated over second shade, then final darker shade...
Bottom-Middle - ...was mixed and applied by Keith, thorough when masking up!
Bottom-Right - To finish, masking was removed and the job sealed with clear lacquer
|